Basic Rails App with Docker
Why Docker
Over the last year I’ve heard more and more talk about Docker in the Rails community. On initial look there is a lot to like about Docker. Containers would have made multi-cloud deployments I’ve done in the past easier. Containers allow you to follow the same process for provisioning servers and for deploying application updates which would make it simpler to push OS level security fixes. Docker’s widespread adoption in the cloud hosting world also means that vendor lock in less likely. Because of all these positives it seemed like a good idea to give Docker a try.
To experiment with Docker I wrote a simple To Do list application using the Rails scaffold. Once I got it running in dev mode I deployed it locally using Docker containers. To follow along with the rest of this post on a Mac you’ll need boot2docker and some recent version of Rails installed. I used Rails 4.2.0.
Creating the Rails App
I started by making a new Rails project called ‘todo’. Then I added a task model using the scaffold. Tasks have a title, notes, a due date, and a completion percentage (represented with an integer).
rails new todo
rails g scaffold task title:string notes:string due:datetime completion:integer
Based on my past experiences with Rails I knew I wanted to use postgres in production but to continue using SQLite in dev and test. To do this I needed to modify the Gemfile.
gem 'rails', '4.2.0'
gem 'sass-rails', '~> 5.0'
gem 'uglifier', '>= 1.3.0'
gem 'coffee-rails', '~> 4.1.0'

gem 'jquery-rails'
gem 'turbolinks'
gem 'jbuilder', '~> 2.0'
gem 'sdoc', '~> 0.4.0', group: :doc

group :production do
  gem 'pg'
end

gem 'capistrano-rails', group: :development

group :development, :test do
  gem 'byebug'
  gem 'web-console', '~> 2.0'
  gem 'spring'
  gem 'sqlite3'
end
I also needed to update database.yml to use postgres in production. I overrode the existing production configuration to use the postgresql adapter. Figuring out how the username, password, and host needed to be configured took a bit more work. I don’t know much about setting up a postgres server so I decided to use the official postgres image from Dockerhub for the database.
The documentation for the postgres image states that it has environment variables for POSTGRES_USER and POSTGRES_PASSWORD. It also exposes port 5432 for connections to other applications. Docker has a concept of container linking that will expose the user name, password, and connection info to the web front end via environment variables. I used those environment variables to set username, password, and host in the database.yml file.
production:
  <<: *default
  adapter: postgresql
  encoding: unicode
  database: todo_production
  username: <%= ENV['PG_ENV_POSTGRES_USER'] %>
  password: <%= ENV['PG_ENV_POSTGRES_PASSWORD'] %>
  host:     <%= ENV['PG_PORT_5432_TCP_ADDR'] %>
Docker-izing the Application
Just like Rails apps have a Gemfile that specifies what gems are needed, Docker apps have a Dockerfile that specifies the set up and configuration for the app.
I based my Dockerfile off the existing library/rails container image. The only changes I made were setting the RAILS_ENV using the Docker ENV command and having the container call an init script once it started up. Here’s the Dockerfile I ended up with:
FROM rails:onbuild

ENV RAILS_ENV=production

CMD ["sh", "/usr/src/app/init.sh"]
One of Docker’s quirks is that a Dockerfile can only contain one CMD line. The CMD line is the line of code that gets executed once the set up is complete and the container is up and running. For the Rails app I needed to do two things on start up: set up the database and then start up Rails. I could have strung these together in one CMD instruction but it was easier to just put them in a shell script. I called the shell script init.sh.
The init.sh file lives in RAILS_ROOT next to the Dockerfile. The Rails image I’m using copies all the files in RAILS_ROOT to the container and so init.sh gets copied along with the application code. Here’s the code in init.sh:
export SECRET_KEY_BASE=$(bundle exec rake secret)

bundle exec rake db:create db:migrate
bundle exec rails server -b 0.0.0.0
This code does basic Rails start up. It sets the SECRET_KEY_BASE using rake secret. This could also be done in the Dockerfile if I wanted a static secret key. After that it creates and migrates the database (if necessary) and then starts up the server using rails server. If the container image supports it you could use unicorn, puma, or passenger here. I plan to show setting up unicorn + nginx in another blog post.
At this point I have all the code I need to start up my app locally using Docker containers. Docker is delightfully concise; it took about 20 lines of change to get a basic Rails app ready for Docker.
Deploying Locally With Docker
Once all the code is written I need to build the Dockerfile to create a Docker image.
docker build -t your_user_name/todo .The -t flag allows me to give the Docker image a name/tag. The convention is to use a username or project name, a slash, and then an image name. I named mine todo. The . at the end of the command tells Docker to build the Dockerfile in the current directory.
Once the image for the Rails app is built I can start deploying. The database needs to be deployed first so that it is running when the Rails container starts up.
docker run --name db -e POSTGRES_PASSWORD=password -e POSTGRES_USER=rails -d postgresThere’s a lot going on here with the command line flags but individually they are pretty simple. docker run starts up a container. --name db names the new container db. If you don’t supply a name Docker will generate a name for you. -e is used to pass environment variables to the container. The documentation for the postgres container states that you can pass the default database password and username into the container using the POSTGRES_PASSWORD and POSTGRES_USER environment variables. The -d tells Docker to run the container in detached mode. Finally postgres is the name of the image that you should use to start up the container.
Once the docker run command completes the database container is running. I can see that that’s the case by trying docker ps.
$ docker ps

CONTAINER ID        IMAGE               COMMAND                CREATED             STATUS              PORTS               NAMES
30e1420e8a57        postgres:9          "/docker-entrypoint.   7 seconds ago       Up 6 seconds        5432/tcp            db
This shows that the db container has been running for 6 seconds and that it was created 7 seconds ago. The start up time for containers is fast although downloading the image can take a while the first time.
Once the database container is started up I can start up the web container.
docker run --name web -d -p 3000:3000 --link db:pg your_user_name/todoThe -d and --name are flags that were used to start up the database container so those should look familiar. your_user_name/todo is the name of the image to use for the container. -p 3000:3000 maps port 3000 on the container to port 3000 on the machine that is hosting the container. This allows me to access the web server running the container from the outside world. --link db:pg links this container to the already running db container. This makes all the environment variables in the db container available in the web container it also creates some environment variables in the web container for every port exposed by the db container. The pg part of the link argument tells Docker to prefix all these environment variables with pg. The environment variables created by --link are used in the database.yml to get the username, password, and host. If you look at database.yml again you can see the pg prefix at the start of the variable names.
username: <%= ENV['PG_ENV_POSTGRES_USER'] %>
password: <%= ENV['PG_ENV_POSTGRES_PASSWORD'] %>
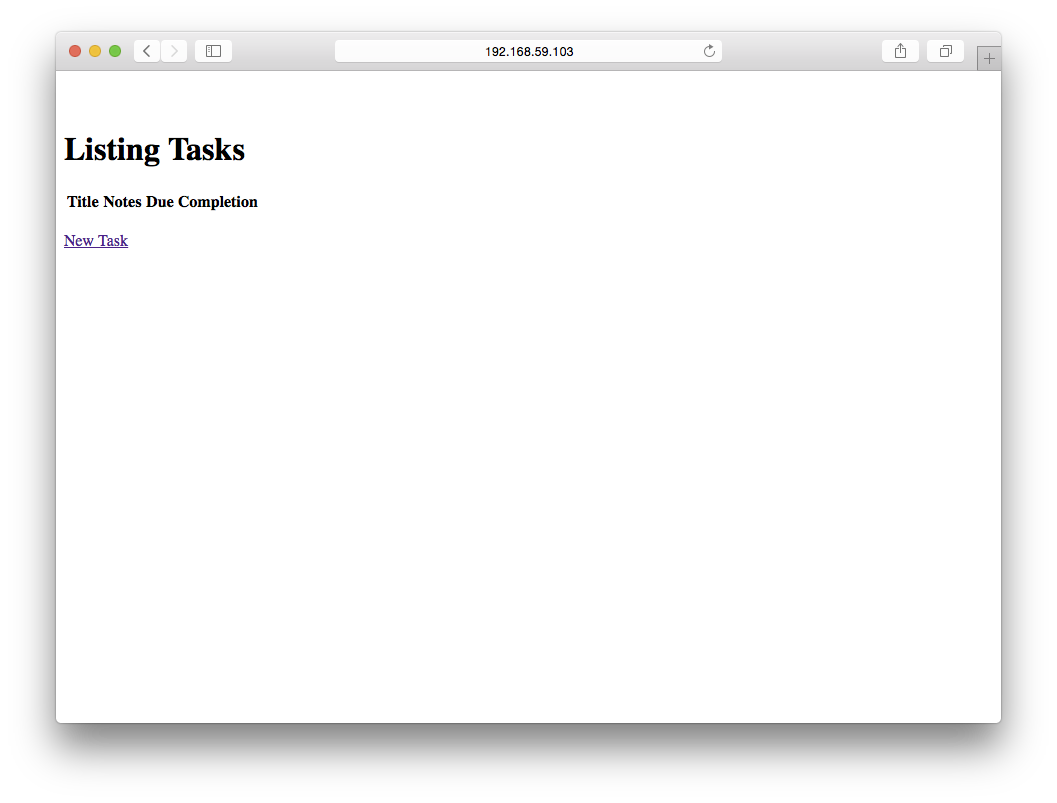
host: <%= ENV['PG_PORT_5432_TCP_ADDR'] %>Once that container is started up I can access the site. Since I’m using boot2docker I use the boot2docker ip command to get the ip address of the Docker host. The app is running on port 3000 and should be accessible in the browser. Here’s what it looks like for me:
In future parts of this series I’ll show how to use kubernetes to manage a more complex container deployment. I’ll also show how to set up a persistent disk and deploy to Google Container Engine.